
If you are making a large number of models, it is useful to have a way to neatly store and transport them. To this end we have created a Blender plugin to create a holder for our models. holder.py is available on our GitHub page.
EDIT (Feb 24, 2020): For Blender 2.80 or higher make sure to use v4.0 or higher of the plugin. New features have also been added since these posts were made, updated version will be available soon.
Step 1: Install the Plugin
See our previous blog post about setting up Blender for instructions on installing a plugin from a file.
Step 2: Add a holder object
Press shift + a, mouse over Mesh, and click on TU Model Holder. This will add a basic model holder object to the scene.

Step 3: Adjust the parameters
After inserting the model holder several parameters can be adjusted:
Number of slots: This is the number of slots the holder will haveWidth of slots: This is how much space will be between each slatHeight of models: This is how high the models will be when placed in the holderLength of models: This sets how wide the holder will beThickness of slot walls: This sets the thickness of the slatsThickness of outside walls: This sets the thickness of all outside walls

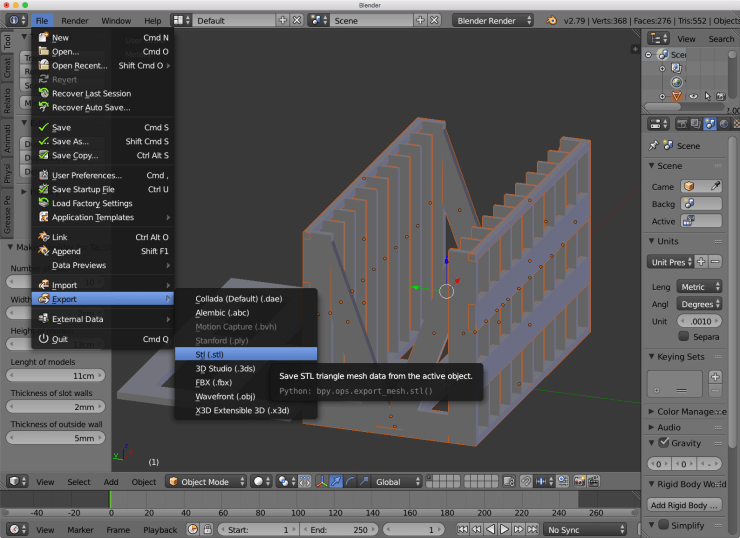
Step 4: Export the base as an STL
The next step is to export the holder model’s base as an STL file. Go to File > Export > Stl, on the export page set Y Forward and Z up (the defaults) and check the box for Selection Only. This will make sure that only the base is saved out to an STL file. The lid will be exported in a later step.
Note: The plugin will make sure all the parts for the base are selected when it is finished.

Step 5: Invert the selected objects
To save the lid as a separate file it needs to be selected. This can be done by “inverting” the selected objects. In the bottom menu (below the 3D view port) click on Select > Inverse or use the keyboard short cut Ctrl + I.

Step 6: Export the lid to an STL file
As we did for the base, we can export the lid to an STL file. This will use the same settings as the base did (just remember to change the name of the file so you don’t overwrite the base).

Step 7: Printing the holder
We use the following print settings:
- Infill: 20-25%
- Raft: No
- Supports: Depends on the slot width, if below
2.5 cmno, if larger yes - Layer height:
0.18 mm
Step 8: Adding magnets to hold the lid on
The final step is to use superglue to attach magnets to the corners of both the lid and the base. We suggest using rare earth magnets that are around 2 mm in diameter and 1 mm thick.
Making holders on the command line
Like with our other tools, we also provide a command line script for automating the process outlined above, make_holder.py. If you have never used any of our command line scripts check out our other blog posts about making models and name plates.
The first step is to create a configuration json file with all the parameters you want to use. Here is an example configuration file that specifies all the possible parameters:
{
  "holder_keywords": {
    "Number_slots": 10,
    "Width_slots": 20,
    "Height_models": 132,
    "Length_models": 112,
    "Thickness_slats": 2,
    "Thickness_walls": 5
  },
  "output_name": "holder",
  "output_path": "/Users/coleman/Desktop"
}
Next copy the TU_startup.blend and make_holder.py files (available on our GitHub page) to the same folder as the configuration file. The command to run the script is:
blender TU_startup.blend --python-exit-code 1 --python make_holder.py -- holder_config.json
This will create two STL files (one for the base and one for the lid) and one blend file containing the full model.

2 thoughts on “7. Making a Model Holder”